


A protractor is a measuring tool made of transparent plastic or glass used to measure and draw angles.
To measure an angle with a protractor, place the centre point on the vertex, line the baseline up with one arm, read the scale that starts at zero on that arm, and check the answer against the angle type.
This guide shows you how to use a protractor for both measuring and drawing, including the two-scale problem behind most Grade 4 and Class 4 errors, and how to estimate an angle when no protractor is to hand.
What Is a Protractor?
A protractor is a measuring instrument used to measure and draw angles in degrees. It is usually a flat, transparent half-circle marked from 0 to 180, with degree marks printed along its curved edge.
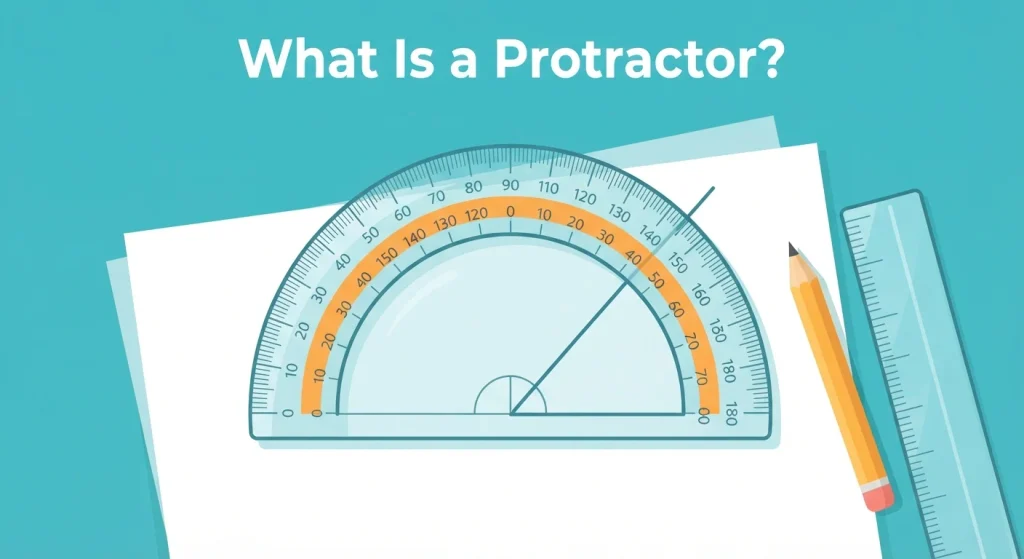
Children meet measuring long before they meet angles. From measuring length, weight and capacity in the early classes, they already understand the basic idea: a tool, a scale, a number. A protractor works the same way. A ruler answers how long something is. A protractor answers how open an angle is.
The half-circle is divided into 180 equal parts, each one degree, written as 1°. The wider the opening between the two arms, the higher the reading.
Semicircular and Full-Circle Protractors
The protractor in your child’s geometry box is almost certainly the semicircular type, a 180° half-moon in clear plastic. It handles every angle taught in Grade 4 and Class 4: acute, right, obtuse and straight.
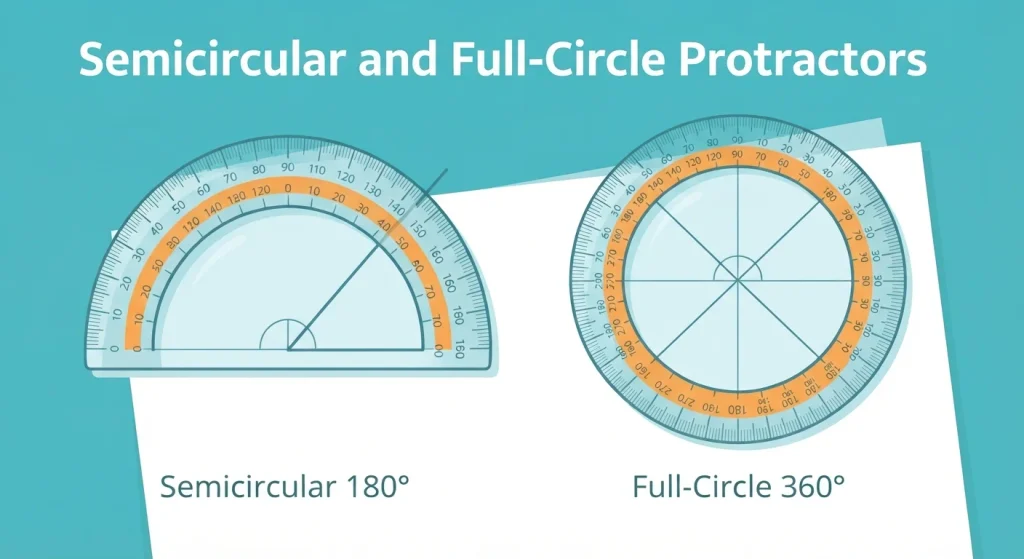
A full-circle protractor is a complete 360° disc. It reads reflex angles directly, which the semicircular version cannot, and is used mainly in architecture and technical drawing. Your child does not need one. Reflex angles are handled on a normal protractor by subtracting from 360, shown below.
What a Protractor Is Used For
A protractor is used for two jobs: measuring an angle that already exists on the page, and drawing an angle to a size you choose. Both use the same tool in opposite directions.
The closest everyday example is a clock, where the hands form a new angle every minute, which is why reading a clock face and measuring angles reinforce each other. The same measurement also sits behind roof pitch in construction, compass bearings in navigation, and any engineering drawing where a part must be cut to a set angle.
Parts of a Protractor
Name the parts out loud before measuring anything. Children who can name what they are aligning make far fewer placement errors, in the same way that naming shapes and their corners has to come before working with them.
The Baseline and the Centre Point
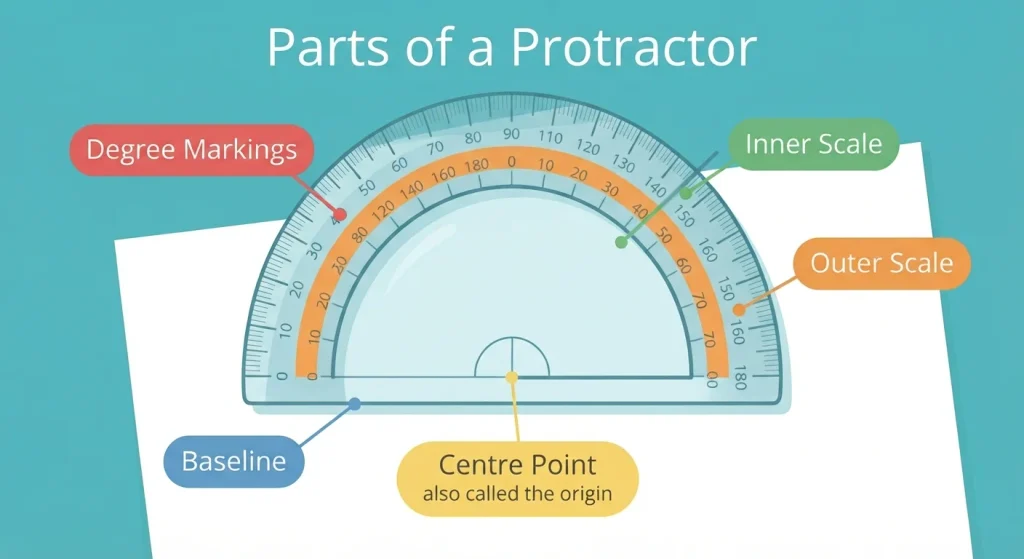
The baseline is the flat bottom edge, with a fine line printed just above the plastic running from the 0 on one side to the 0 on the other. That printed line, not the plastic edge, is the true baseline. It sits on top of one arm of the angle.
The centre point is the small hole, cross or notch in the middle of the baseline. It goes exactly on the vertex. NCERT textbooks call this point the origin, so your child may meet either name. They mean the same thing.
The Inner Scale and the Outer Scale
Two full sets of numbers run along the curved edge, each going 0 to 180 in opposite directions. The outer scale usually starts at 0 on the left. The inner scale starts at 0 on the right. At every position the two readings add up to 180: where one says 60, the other says 120.
Why There Are Two Sets of Numbers
An angle can open to the left or to the right. With only one scale, every angle opening the wrong way would need the paper turned around before it could be measured. The second scale removes that.
Choosing between them is where most Grade 4 and Class 4 marks are lost. The fix is one rule:
Start from the zero that sits on your angle’s arm.
Find the arm you lined up with the baseline. See which scale shows 0 on that arm. Count up from that zero. That rule holds whichever way the angle opens and however the page is tilted, which is why it beats the usual shortcut about angles on the left or right. That shortcut only works when the baseline happens to be horizontal.
If your child reads the wrong scale, the answer will be 180 minus the correct one. An acute angle reported as 140° is this error every time.
How to Use a Protractor to Measure an Angle
Here is how to use a protractor to measure angles, step by step. Work through all five until the sequence is automatic.
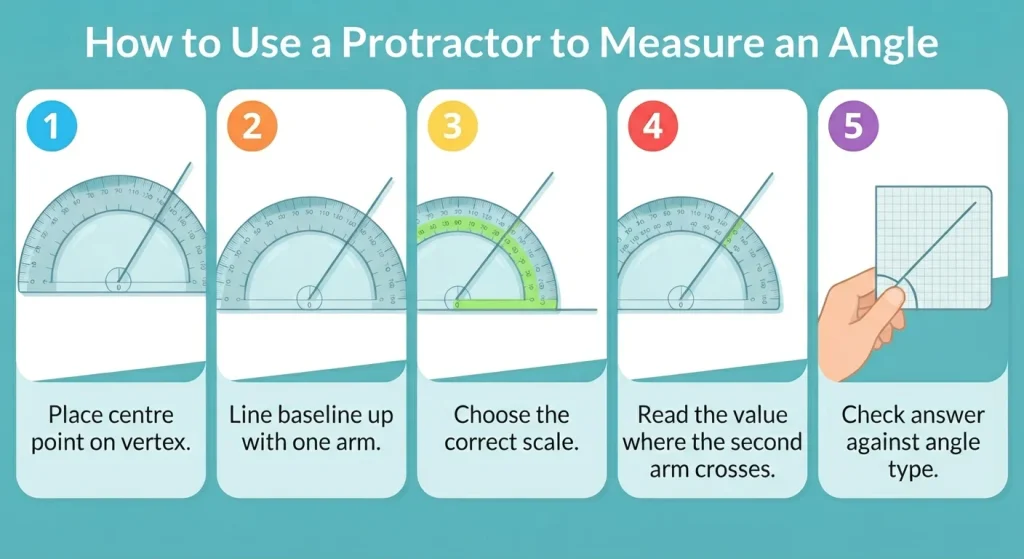
- Place the centre point exactly on the vertex. Look through the plastic and confirm the hole or cross sits over the corner where the two arms meet. A millimetre of drift costs two or three degrees.
- Line the baseline up with one arm. Keeping the centre point pinned on the vertex, turn the protractor until the printed baseline lies along one arm. Either arm works, so pick the easier one.
- Choose the correct scale, inner or outer. Look at the arm you just aligned and see which scale reads 0 on it. That is your scale. Ignore the other set of numbers completely.
- Read the number where the second arm crosses. Follow the chosen scale up from its zero to where the second arm meets the curved edge. If the arm is too short, extend it with a ruler first. Lengthening an arm does not change the angle.
- Check your answer against the angle type. Ask whether the angle looks narrower or wider than the corner of a notebook. An acute angle must read below 90 and an obtuse angle above 90. If the number contradicts what you can see, you read the wrong scale.
That last step rests on being able to classify an angle by sight, which is worth building alongside the other foundational geometry skills for this age. A child who cannot tell acute from obtuse at a glance has no way to catch a scale error.
How to Draw an Angle Using a Protractor
Drawing uses the same placement, then runs it backwards: you pick the number first and find the point second.
Drawing a 60 Degree Angle
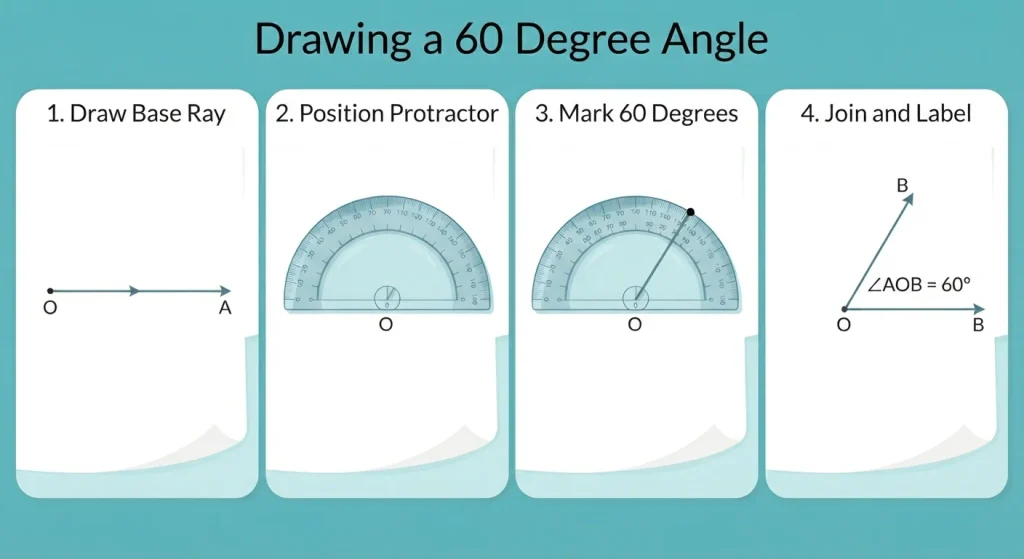
- Draw the ray. Use a ruler to draw a straight ray and label its starting point O, running out to a point A. This is your base.
- Place the protractor. Centre point exactly on O, printed baseline exactly along OA.
- Find the zero. Note which scale reads 0 on ray OA. Count on that scale only.
- Mark the point. Count up to 60 on that scale and make a small dot just outside the curved edge, level with the 60 mark. Keep the pencil sharp, because a fat dot costs a degree or two.
- Join and label. Lift the protractor and draw a straight ray from O through the dot with a ruler. Label it B. You now have ∠AOB = 60°.
Check it: 60° is acute, so the finished angle should look clearly narrower than a notebook corner. If it looks wide, you counted on the wrong scale and have drawn 120° instead.
Drawing an Angle Larger Than 180 Degrees
A semicircular protractor stops at 180, so a reflex angle is drawn indirectly. To draw 250°:
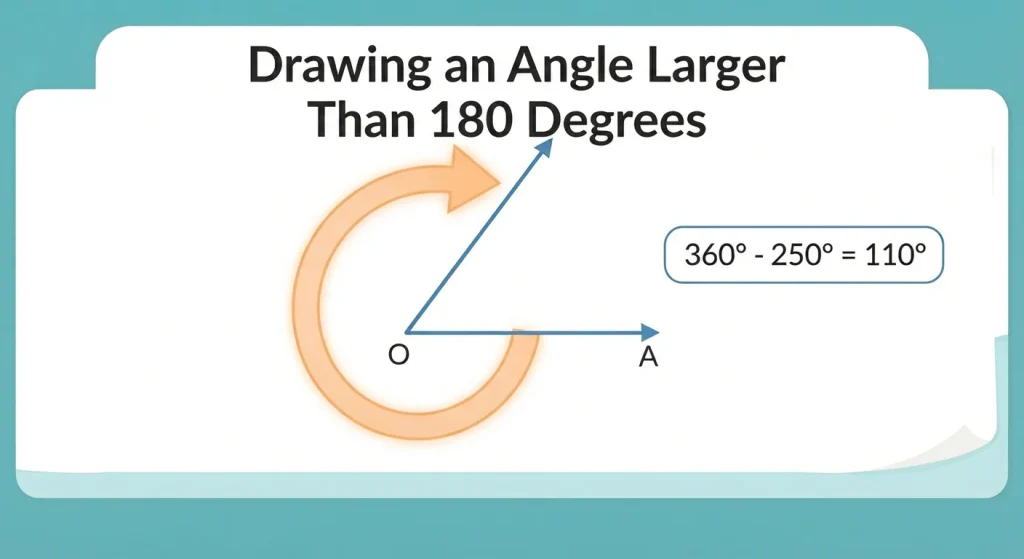
- Subtract from a full turn: 360 − 250 = 110.
- Draw an angle of 110° in the ordinary way.
- Mark the reflex region on the outside of that angle with a small curved arrow sweeping the long way round.
The figure is correct. The arrow tells the reader which of the two angles at that vertex is the 250° one.
Common Protractor Mistakes
Reading the wrong scale. The answer comes out as 180 minus the real measure. Go back to the aligned arm and find the zero sitting on it, rather than correcting the number.
Vertex not sitting on the centre point. Readings land two to five degrees out, consistently. Pause after placing and look through the plastic before reading anything.
Baseline not aligned with an arm. Small repeated errors, all in the same direction. Check that the arm follows the printed 0-to-0 line, not the plastic edge below it.
Arm too short to reach the scale. The child guesses where the arm would have crossed. Extend it outwards from the vertex with a ruler before measuring. This changes nothing about the angle.
How to Measure an Angle Without a Protractor
You cannot measure an angle precisely without one, but you can estimate it closely and check whether a protractor reading is believable.
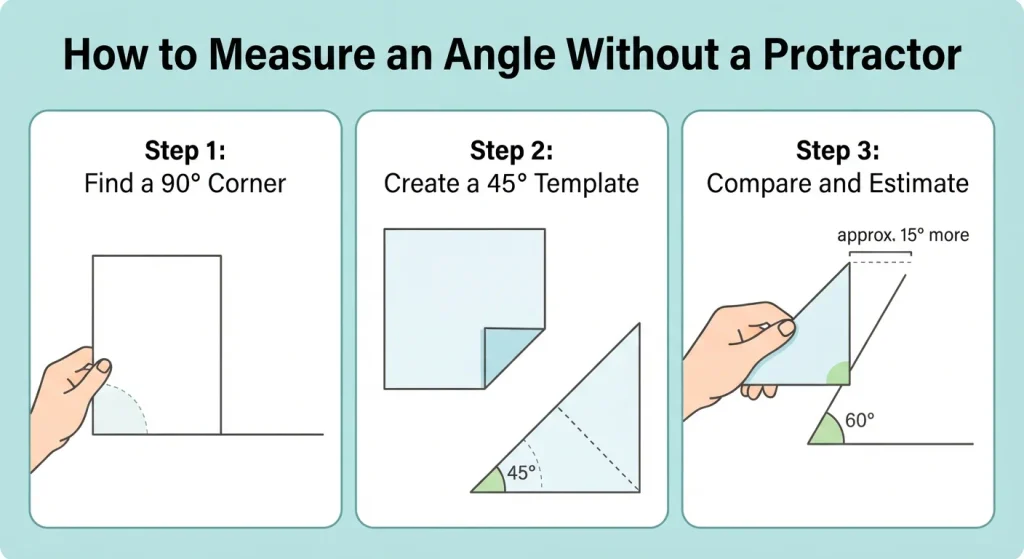
Use the corner of a page. Any sheet of paper has four 90° corners. Hold one into the angle. If the angle swallows the corner with room to spare, it is obtuse, above 90°. If the corner overhangs, it is acute, below 90°. If it fits exactly, you have a right angle.
Fold your own reference angles. Fold a square sheet corner to corner and you have an exact 45°. Fold again for 22.5°. These folds are accurate, so your child can hold them against a drawn angle and judge: more than the 45 fold, less than the corner, so somewhere near 60.
Estimating by eye is a visual reasoning skill rather than an arithmetic one, and it improves with practice the same way spatial understanding does. Treat all of it as estimating and checking, not as a replacement for the tool. The protractor gives the measurement. These methods tell you whether to trust it.
Practice: Measure These Angles
Measure each angle below. Before reading the scale, write down whether you expect an answer above or below 90.
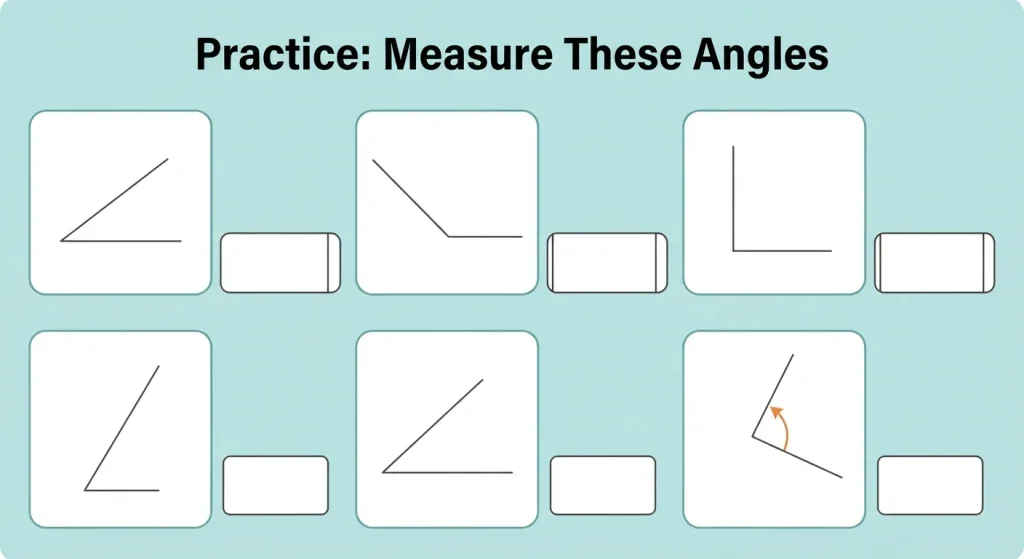
- A narrow angle opening to the right.
- A wide angle opening to the left.
- An angle that fits a paper corner exactly.
- A narrow angle drawn at a tilt, with neither arm horizontal.
- An angle with one very short arm. Extend it before measuring.
- A vertex marked with a sweeping arrow the long way round. Measure the small angle and subtract from 360.
Answers: 1. 45° acute · 2. 130° obtuse · 3. 90° right · 4. 35° acute · 5. 70° acute · 6. small angle 80°, so reflex angle 280°
Accurate diagrams matter well past this stage. Students who draw and measure carefully now find it much easier to see what is going on in a figure when they start working through harder geometry problems later.
Make Preparing for Math Olympiad Simple!


What is a protractor used for?
A protractor is used to measure the size of an angle in degrees and to draw an angle of a given size. Outside school it is used in construction, navigation, engineering drawing and design, wherever a specific angle has to be set or checked.
What is the shape of a protractor?
The common classroom protractor is a semicircle, a flat transparent half-disc marked from 0° to 180° along its curved edge. Full-circle protractors are complete 360° discs and are used mainly for technical work.
How do you read the two scales on a protractor?
Use the scale that shows 0 on the arm you lined up with the baseline, and count upwards from that zero. The two scales run in opposite directions and always add to 180 at any position, so reading the wrong one gives you 180 minus the correct answer. Checking whether the angle is acute or obtuse before you read catches the error every time.
What is a protractor in geometry?
In geometry, a protractor is the instrument used to measure and construct angles. It is one of the standard tools in a geometry box alongside the ruler, compass and set squares, and it is the only one of them that reads angles directly in degrees.
Can you measure a reflex angle with a normal protractor?
Not directly, because a semicircular protractor only reaches 180°. Measure the smaller angle at the vertex instead, then subtract it from 360. If the smaller angle is 85°, the reflex angle is 360 − 85 = 275°. A full-circle protractor reads reflex angles directly.
How do you measure an angle without a protractor?
You can estimate it. Hold the corner of a sheet of paper into the angle to decide whether it is below, at or above 90°, and fold a square sheet corner to corner to make an exact 45° reference. Comparing against those benchmarks gets most estimates within about 10°.
Conclusion
Using a protractor well comes down to three habits: put the centre point on the vertex, start counting from the zero that sits on your angle’s arm, and check the number against what the angle plainly looks like.
Those three catch almost every mistake a Grade 4 or Class 4 student makes. Everything else, drawing angles and handling reflex angles included, is the same five steps running in a different order.

Mikha Piregu is a Content Writer with experience spanning educational content, including math and math olympiad topics, as well as advocacy writing, research-based articles, and SEO-driven web content. He creates high-quality blog content, web copy, and feature articles that support brand visibility, audience engagement, and long-term organic growth through data-informed storytelling. Skilled in WordPress, WooCommerce, and modern digital tools, Mikha adapts content across various platforms, including blogs, websites, campaigns, and advocacy initiatives, with clarity and purpose.

There are no comments posted here yet.
Sign in to leave a comment