 December 23, 2025
 13 min. read

Teaching ascending and descending order in Class 1 math is not simply a matter of explaining two definitions and handing over a worksheet.
The difference between children who genuinely understand ordering and those who merely follow a procedure almost always comes down to one thing: how the concept was first introduced.
Children taught through physical experience, objects they can touch, move, and arrange, build an understanding that transfers to every number topic that follows.
This guide covers the complete teaching sequence for Class 1.
If your child is new to the topic and needs the definitions first, start with ascending and descending order — what it means and how it works, then return here for the teaching method.
For ready-to-use practice questions at every level once the concept is taught, see examples of ascending and descending order for Class 1.
The Teaching Principle: Concrete Before Abstract — Always
Every effective lesson on ascending and descending order follows the same progression:
Concrete → Representational → Abstract

This is not optional enrichment. It is the pedagogical foundation of how Class 1 children build genuine mathematical understanding rather than surface-level compliance.
- Concrete means physical objects children can touch, move, and rearrange. Start here — always.
- Representational means number cards, pictures, or number lines that visually show quantities.
- Abstract means written numerals on a page, arranged or completed in exercises.
The single most common teaching mistake at the Class 1 level is jumping straight to written exercises before children have sufficient concrete and representational experience.
Children who practise this way learn to follow a procedure without understanding what ordering means and this gap shows up as errors and confusion the moment question types change.
Short daily sessions of 10–15 minutes produce far greater fluency than occasional longer lessons.
Build the habit of daily ordering practice, vary the activity, and the concept moves from conscious effort to automatic knowledge within two to three weeks.
Step 1: Build the Counting Foundation First
Before introducing any ordering concept, children must be fluent in both forward and backward counting.
This is not a preliminary warm-up; it is the essential prerequisite.

Forward counting builds ascending order readiness. A child who can count forward from any starting point, not just from 1, already understands that each next number is bigger than the previous one.
This is the core concept of ascending order, already internalised through counting. The teaching task is simply to connect the label.
Backward counting builds descending order readiness. A child who can count backward from 10, from 15, or from 20 understands that each next number is smaller.
This is the core concept of descending order, and it is the harder skill. Most children need significantly more backward counting practice than forward before descending ordering feels natural.
Daily counting practice what to do:
- Count forward from a random number: “Start at 7 and count to 16.”
- Count backward from a random number: “Count down from 13.”
- Physical backward counting: count down while descending stairs, launching a pretend rocket, or clapping out each number.
Do not move to Step 2 until: the child can count forward to 20 from any starting point without hesitation, and backward from 10 (building toward 20) without losing track.
Step 2: Teach Ascending Order With Physical Objects
Introduce ascending order using physical objects before any numbers are shown.
The concept of “smallest to largest” is most naturally understood through real, touchable things with visible size differences.

What to use: 3–5 objects of clearly different sizes toy cars, bottles, books, blocks, cups. The size difference should be obvious to the eye without measuring.
How to run the lesson:
Place the objects in a random arrangement. Say: “Can you put these in order from the tiniest to the biggest? The smallest goes first.”
Once the child arranges them, narrate what they have done: “You put the smallest first, then the next bigger one, then the next, and the biggest last. That is called ascending order, going up from small to big.”
Key teaching points:
- Use “ascending order” and “small to big” interchangeably from the first lesson
- Ask the child to explain their arrangement aloud: “Why did you put this one first?”
- Verbalising the reasoning builds the comparative thinking that all number sense requires
- Do not correct silently ask the child to identify their own error first
Progression: Once 3-object arrangements are fluent, extend to 4 objects, then 5. Introduce size-comparable groups of counters before moving to numeral cards.
Step 3: Teach Descending Order With Physical Objects
Introduce descending order only after ascending order with physical objects is secure.
Use the same objects from Step 2.

Same objects, opposite arrangement. This contrast is the most powerful single teaching move available for this concept.
How to run the lesson:
Take the ascending arrangement and say: “Now let’s reverse it. This time, the biggest goes first and we go down to the smallest. That is called descending order going down from big to small.”
The fact that identical objects produce two opposite arrangements makes the directional distinction concrete and memorable.
Children who see this contrast with physical objects first rarely confuse the two directions later because they have a physical experience to anchor the abstract concept.
The descending order memory anchor to use every session: “Descending means going down like coming down stairs, like sliding down a slide, like counting down before a rocket launches.”
Repeat this language every descending order session until it becomes automatic for the child.
Common error at this step: Teaching both directions in the same first lesson. Establish ascending order fluency over 2–3 sessions before introducing descending.
Teaching both simultaneously before either is secure creates direction confusion that takes weeks to unpick.
Step 4: Move to Number Cards
Once physical object ordering is fluent in both directions, introduce number cards.
This is the representational stage, where children are now working with symbols that represent quantities rather than the quantities themselves.

Why number cards before written exercises: Cards are physical and reversible. A child who places a number card incorrectly can pick it up and move it without the frustration of erasing or crossing out.
This low-stakes interaction with numbers builds confidence that written exercises alone cannot provide.
How to introduce number cards:
Write numbers on individual cards, starting with just three (for example, 3, 7, 1). Shuffle them and place them face up. Ask: “Can you arrange these in ascending order? Remember smallest first.”
Once three-card ascending arrangements are fluent, add a fourth card, then a fifth. Then introduce the same exercise in descending order.
The direction question is used every single time: Before the child touches any card, ask: “Are we going up or down today?” The child states the direction aloud before placing a single number.
This habit deciding direction before starting prevents every mid-sequence direction change error.
Progression through card difficulty:
Five cards within 20 mixed, no obvious pattern
Three cards within 10
Four cards within 10
Five cards within 10
Three to four cards within 20
Step 5: Introduce the Symbols
Once ordering with cards is fluent in both directions, introduce the less-than (<) and greater-than (>) symbols. Not before.

Symbols are shorthand for a relationship children must already understand. Introduced too early, they create a second layer of confusion on top of an unstable concept.
Introduced once ordering is secure, they click immediately and permanently.
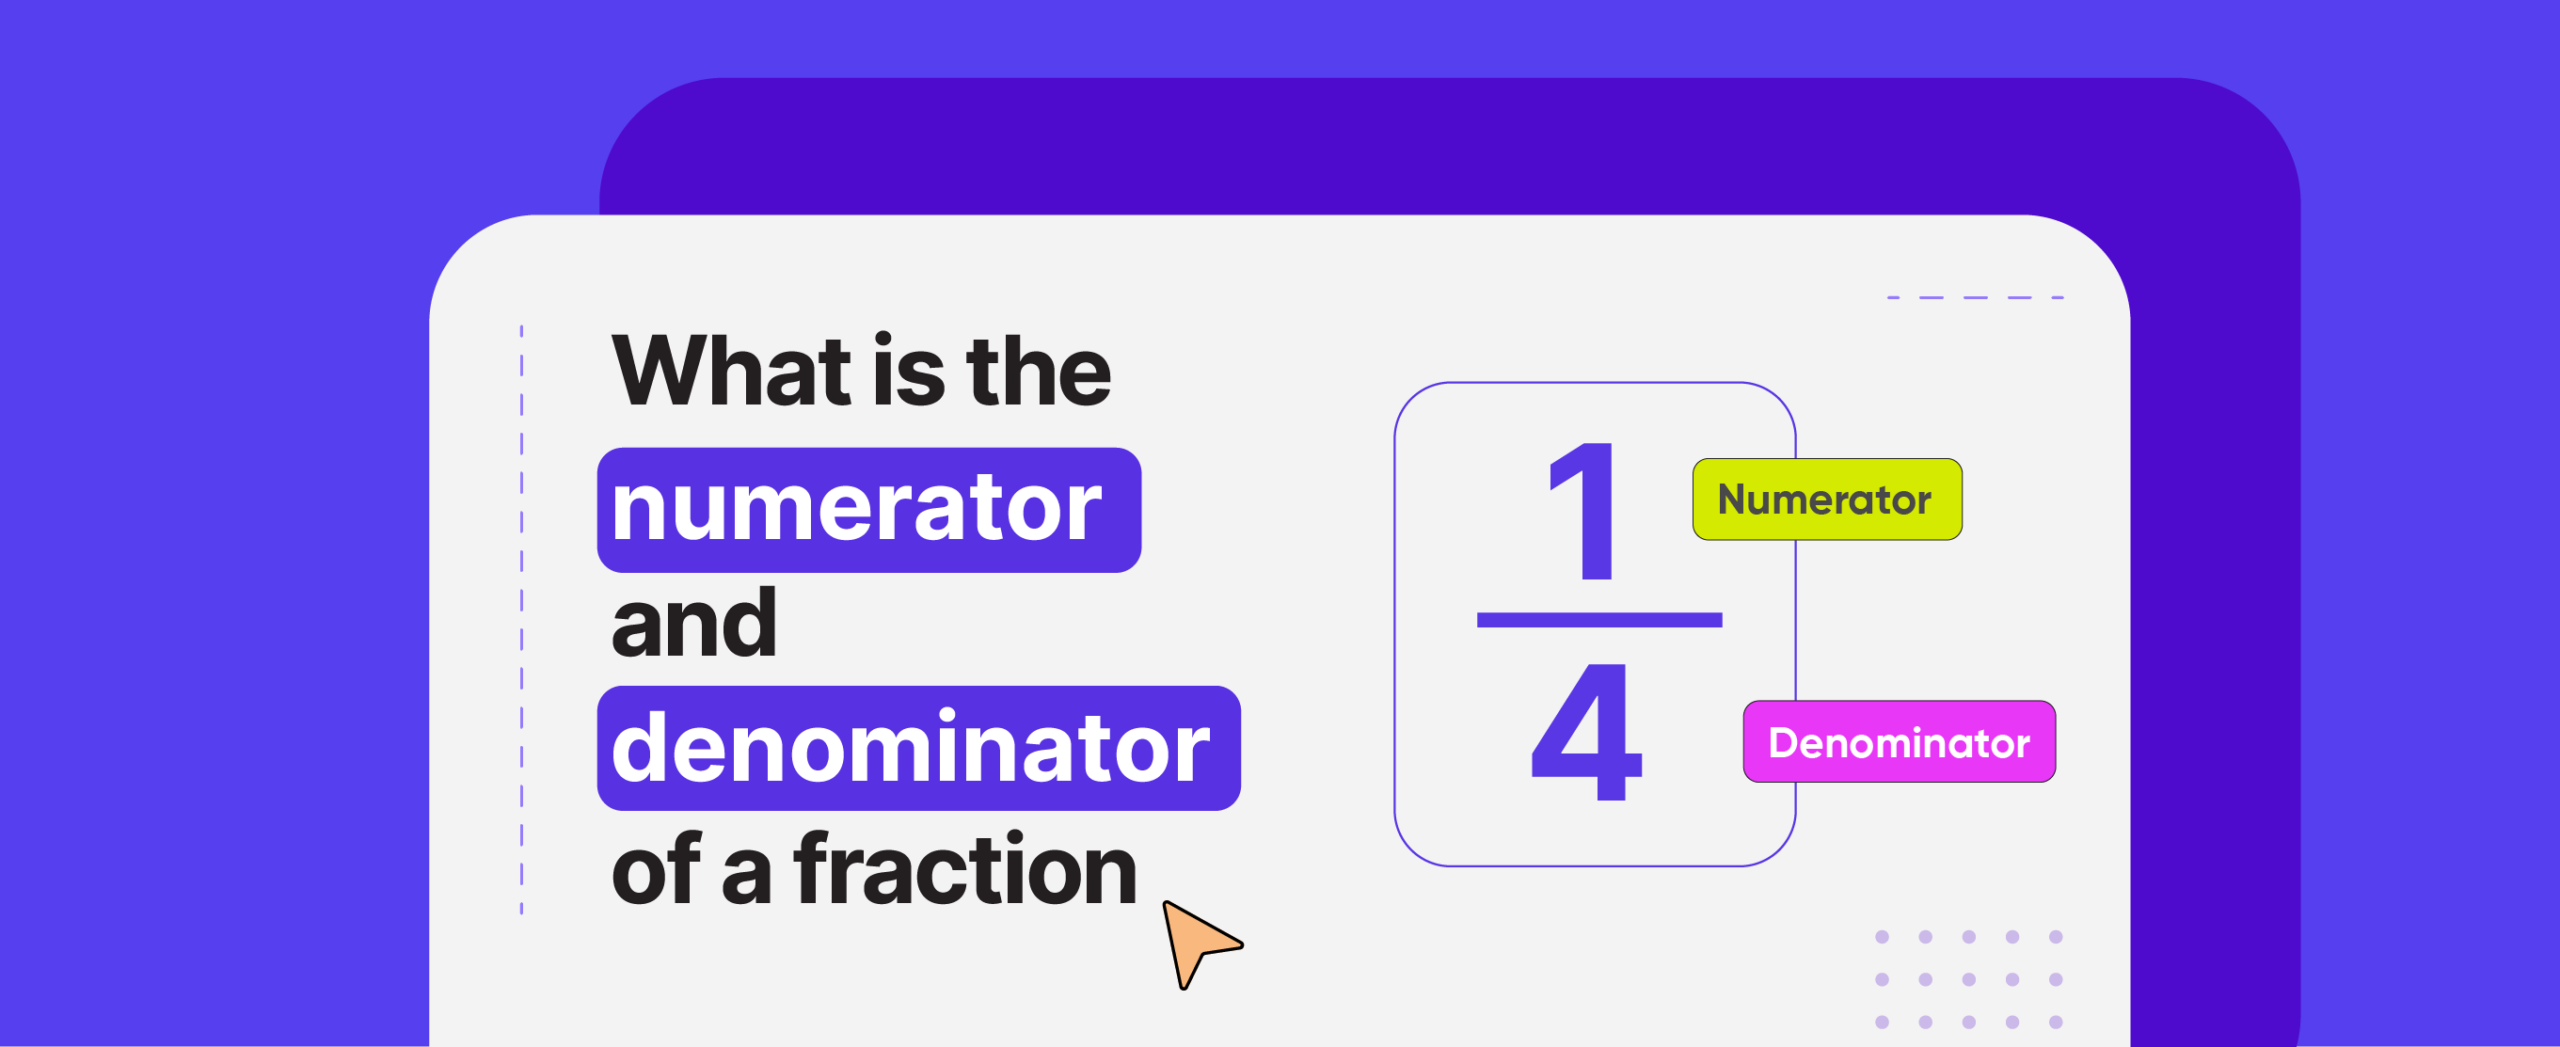
How to introduce the less-than sign (<):
Show two numbers, for example, 3 and 7. Say: “3 is less than 7. We write it like this: 3 < 7.”
Point to the open side of the symbol and say: “The open mouth always faces the bigger number it eats the bigger one.”
Then connect it to ordering: “In ascending order, every number is less than the one after it. So we can write our ascending sequence like this: 2 < 5 < 8.”
How to introduce the greater-than sign (>):
Follow the same method. Show 9 and 4. “9 is greater than 4. We write: 9 > 4. The open mouth faces the bigger number.”
Connect to ordering: “In descending order, every number is greater than the one after it. So we write: 8 > 5 > 2.”
Ascending and descending order signs quick reference for teaching:
- Ascending order sign: < (less than) each number is less than the one that follows
- Descending order sign: > (greater than) each number is greater than the one that follows
Ask children to read the signs aloud, “3 is less than 7”, “9 is greater than 4”, before they write them. Verbal practice with the symbols builds the language of comparison that all number work through Class 2 requires.
Step 6: Consolidate With Written Exercises
Written exercises are the abstract stage, the final step in the progression, not the starting point. By the time children reach written ordering exercises, they should already be fluent with physical objects and number cards.
Written practice consolidates what has been learned. It does not build understanding.
Effective written exercise types for Class 1:
- Arrange a given set in ascending order
- Arrange a given set in descending order
- Identify whether a given sequence is ascending or descending
- Fill in missing numbers in a sequence
- Write the correct < or > sign between two numbers
One critical rule during written practice: Keep a number line visible at all times. Children who are uncertain about the relative size of two numbers should check the number line before placing this is a good mathematical strategy, not a sign of weakness.
Removing the number line too early creates errors that undermine confidence.
For a complete bank of graduated written exercises with full worked solutions across five difficulty levels, see examples of ascending and descending order for Class 1.
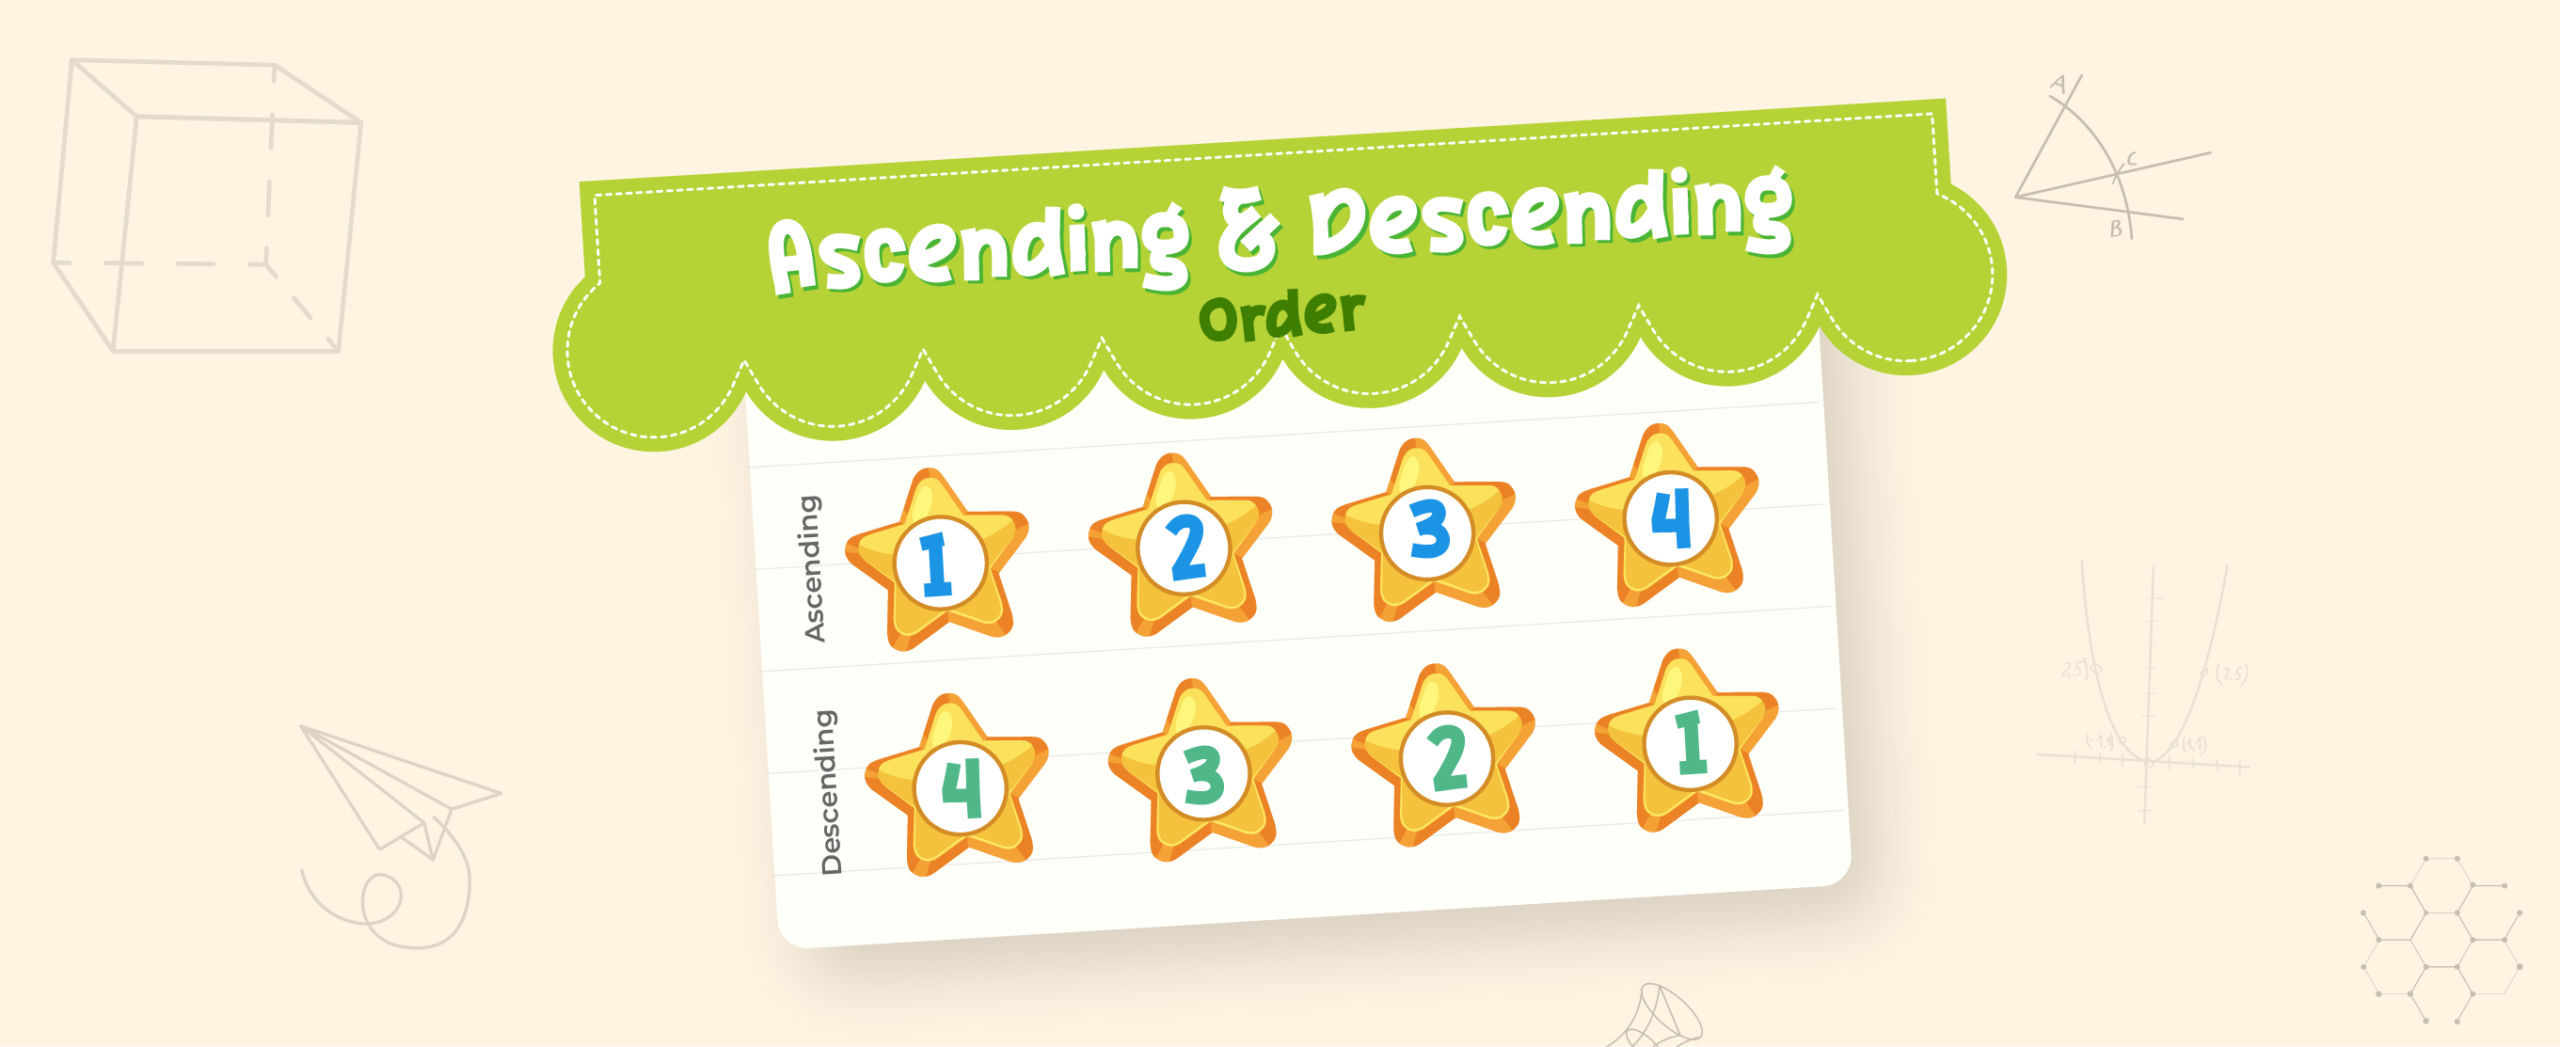
6 Activities to Reinforce Both Directions

Activity 1 — Human Number Line
Give children number cards 1–10. Ask them to arrange themselves in ascending order. Call “Reverse!” and have them rearrange in descending order.
The physical, social element makes direction-switching memorable and enjoyable in a way no worksheet can replicate. Works equally well at home with soft toys standing in for children.
Activity 2 — Card Sort Race
Give two children identical shuffled sets (for example, 1, 3, 5, 7, 9). Call “Ascending!” or “Descending!” first to arrange correctly wins.
The direction-calling element forces children to consciously choose before starting, building the direction-first habit automatically through repetition.
Activity 3 — Staircase Drawing
Ask the child to draw a staircase with five steps. Write a number on each step, smallest at the bottom to largest at the top for ascending, or largest at the bottom to smallest at the top for descending.
The visual reinforces the “going up / going down” analogy every time the child draws it. Displayed near the desk, it becomes a reference that the child returns to independently.
Activity 4 — Object Sort and Label
Arrange 4–5 household objects in ascending or descending order by size. Write the corresponding position numbers underneath each object.
This bridges the concrete (physical objects) and representational (numbers) stages simultaneously and is particularly useful for children who need more concrete experience before card work.
Activity 5 — Number Line Jump
Use a floor number line (tape on the floor with numbers) or a large desk number line. Call a starting number and a direction: “Start at 3, jump ascending to 8.” The child jumps or points along the line in the correct direction.
Reinforces both the directional convention and the spatial understanding of ordering that makes number line work intuitive.
Activity 6 — Arrow Worksheet Habit
On any written ordering exercise, ask the child to draw a small arrow above the answer space before writing any numbers: ↑ for ascending, ↓ for descending.
This single habit takes five seconds and prevents the most common ordering error (direction change mid-sequence) with no additional instruction required.
Common Teaching Mistakes to Avoid

| Mistake | Why It Causes Problems | Fix |
|---|---|---|
| Starting with written worksheets | Children learn procedure without understanding direction | Always start with physical objects — worksheets are the final step |
| Teaching both directions simultaneously | Direction confusion before either is secure | Establish ascending fluency over 2–3 sessions before introducing descending |
| Not asking the direction question first | Children begin ordering without consciously deciding up or down | Ask every time before any ordering: “Are we going up or down?” |
| Correcting errors without asking why | Child does not understand the source of the mistake | Ask “how did you decide which came first?” before providing the correction |
| Removing the number line too early | Children guess relative size rather than confirm it | Keep the number line available throughout all written practice |
| Using worksheets as the primary learning tool | Procedure without understanding — errors compound over time | Worksheets consolidate; they do not build understanding |
The most important single fix across all these mistakes: ask the direction question before any ordering begins, every time, without exception.
Children who state “I am going up” or “I am going down” before placing a single number make dramatically fewer mid-sequence errors than those who begin without the explicit direction decision.
When Each Step Is Ready — Progress Checklist
Use this to gauge whether to stay at the current step or move forward.
Ready to move from physical objects to number cards:
- Child arranges 5 objects in ascending order without prompting or pausing
- Child arranges same 5 objects in descending order without confusion
- Child can explain aloud why each object is in its position
Ready to move from number cards to symbols:
- Child arranges 5 mixed number cards (within 20) in ascending order correctly
- Child arranges same 5 cards in descending order correctly
- Child states the direction aloud before starting without being prompted
Ready to move from symbols to written exercises:
- Child correctly reads 3 < 7 aloud as “3 is less than 7”
- Child correctly reads 9 > 4 aloud as “9 is greater than 4”
- Child can write the correct sign between any two numbers within 20
Ready to extend difficulty:
- Child completes 5-number written ascending and descending exercises within 20 without errors
- Child can identify whether a given sequence is ascending or descending at a glance
- Child can fill in missing numbers in a simple ascending or descending sequence
How long should each teaching session be?
For Class 1 children, 10–15 minutes of focused ordering activity is optimal. Short sessions with full engagement produce faster learning than longer sessions where attention drifts. Daily 10-minute sessions across two weeks will produce far greater fluency than occasional longer lessons.
My child can do ascending but always struggles with descending. What should I do?
Spend 5 minutes daily on backward counting from varied starting points before any descending ordering practice. Backward counting fluency is the specific skill that makes descending order feel natural — it cannot be replaced by more descending ordering practice alone. Once backward counting from 10–20 is fluent, descending ordering typically becomes much easier.
When should I introduce the < and > symbols?
Only after both ascending and descending ordering with numbers is one fluent in both card and written form. The symbols are abstract shorthand for the comparison relationship that ordering develops. They are introduced as shorthand, with explicit connection to the ordering work: “7 > 4 means 7 comes after 4 in ascending order.”
How does this connect to competition mathematics?
Ordering and sequencing problems appear consistently at the Class 1 competition level, arranging sets of numbers, completing sequences, and identifying the correct ordering direction. Children taught through the concrete-to-abstract progression in this guide approach these problems with natural confidence. The IMO syllabus for class 1 covers all number topics assessed at this level.
Make Preparing for Math Olympiad Simple!


Conclusion
Teaching ascending and descending order in Maths Class 1 follows one non-negotiable principle: concrete before abstract, always.
Start with physical objects. Build ascending order fluency before introducing descending. Ask the direction question before every ordering activity.
The activities in this guide provide the varied, repeated exposure that builds genuine ordering fluency across all contexts.
Use them daily in short sessions, and the concept that once confused children becomes second nature within weeks.
For the conceptual definitions and symbols explained in full, see what is ascending and descending order.
For graduated practice questions ready to use at every difficulty level, see examples of ascending and descending order for Class 1.